Pages

Friday, September 29, 2023

It's Dare to Share Saturday!

It is Friday night, and you know what that means..
It is time to Dare to Share!  

Poof! In two days, September is gone and October is upon us. October is actually one of my favorite months.  We have a lot of fun events that happen in October, birthdays, an anniversary, and of course Halloween. This year we will be adding in an mini vacation and a concert that I have been looking forward to for MONTHS.  I will share more about that soon! 


I shared earlier this week how to make my Dollar Tree Light Up Ghosts.  They are super easy and fun to make.  


On Instagram, I also shared how to make the Dollar Tree viral paper towel holder ghost.  You can see how I made him here.  


Last week I shared my Halloween Indoor Treasure Hunt, this week I shared my Halloween Outdoor Treasure Hunt.  They are currently on sale in my Etsy Shop this weekend!  

Want to receive updates in by email?  Subscribe to my email list here.

Now that you know what I have been up to this week, I would love to see what you have been up to.  Link up and HAVE FUN! 


You are invited to the Inlinkz link party!

Click here to enter

Monday, September 25, 2023

How to Make a Dollar Tree Light Up Ghost


I made both of these ghosts using only Dollar Tree products. They are really easy to make, and look so cute hanging out on the table.  

** This post also contains affiliate links and I will be compensated if you make a purchase after clicking on my links


The first ghost I made was the mop head ghost. To make this ghost you will need a mop head, a plastic vase (it's upside down in this photo) and some black felt. I found this multipack of 8 sheets of felt in the craft aisle. 


Using my glue gun, I glued the mop head on top of the upside down plastic vase. It should look like Cousin It from the Addams family but with white hair.  :)  You can leave the strands of the mop in one piece, or separate them like I did in the next photo. 


I personally like the look of separated strands for my ghost.  The string looks lighter and fluffier, and it is a little easier for light to shine through.  


Using the black felt in the multipack and cut out two circles for the eyes of the ghost.  


I added the eyes with my glue gun. I also used the felt to make my ghost a hat. While I like his hat, I thought I might find something else that might work better.   


I found this hanging ghost with the perfect hat.  I removed the hat from this ghost and saved the fabric. 


Doesn't this hat look so much better.  I used my glue gun to keep it in place.  


The taller ghost is even easier to make. You will need one of these 36 inch hanging ghost , another vase or paper towel holder.  My store was completely out of paper towel holders, so I used another yellow vase.  

Underneath the white sheet of the hanging ghost is this Styrofoam head and arms. You are going use this as the base of your ghost. 


There are two ways you can make this ghost.  You can attach the head to one of Dollar Tree's paper towel holders, if you can find one.  I have not been able to find one recently, but when I do, I plan on making another ghost.  Instead, I attached the head to the top of the upside down plastic vase like we did to the other ghost. 


I folded over the fabric, and draped it over the head and vase. I hid the pre-printed face on the bottom side of the fabric.  


I used the green hat version of the hanging ghost for this ghost's hat. Since I was not able to keep that ghost in one piece while trying to remove it's hat, I reused it's eyes for this ghost.  I also decided to add a small green pumpkin that I found in the Halloween aisle. 


I used the Dollar Tree push lights for both ghosts.  You will need three AAA batteries per light.  I placed the light underneath the vases, and they lit up nicely. 


Which type of ghost do you like better?  If you would like to see a quick reel tutorial on how to make the mop ghost, you can see how on my Instagram page here.

Friday, September 22, 2023

Let's Dare to Share!I


 It's Friday night, and you know what that means..
It is time to Dare to Share! 


If you joined last week's Dare to Share, you saw that it was the night before my step daughter's wedding. I am happy to say it was a BEAUTIFUL ceremony and day.  The weather was perfect, no major mishaps happened, and everyone had fun.  The was a minor mishap when I fell down during pictures, but it was actually pretty funny, and I was not hurt. I may have been a little embarrassed, but I can easily laugh at myself, and it is now a fun memory of the day. We were all impressed with the brides vision for the wedding. It took many hours of set up and clean up, but it was all worth it. If you would like to see the photos for your own decor ideas, you can see them in my post Beautiful Wedding Decor Ideas


This weekend I was originally going to be working at multiday festival with my friend's bakery.  We found out late last week that it was best if we did not do it, so I had extra time to work in my Etsy Shop this week.  I have added a few new Halloween listings recently  like my Pink Halloween Treasure Hunt.  


This weekend I will have time to be working on several Halloween crafts like this cute light up ghost.  He is really easy to make, and all the supplies are from the Dollar Tree. I will be posting how to make him and some other crafts this upcoming week. 

Speaking of the Dollar Tree, if you would like to keep up with Dollar Tree's new finds and crafts, I would love to have you join me on Instagram. I share new finds daily.  


Now that you know what I have been up too, I would love to see what you have been up to.  Link up and HAVE FUN! 


You are invited to the Inlinkz link party!

Click here to enter

Wednesday, September 20, 2023

Beautiful Wedding Decor Ideas


If you visited last Friday's Dare to Share Party, you saw that my bonus daughter got married this past weekend. It was a very long weekend with a lot of set up and clean up, but the wedding was BEAUTIFUL! We had such a great day with gorgeous weather.   The bride had a specific vision of what she wanted for her decorations, and made most of them over the last couple of months.


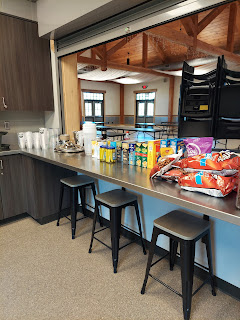
Part of her vision for the wedding is to make sure everyone had plenty to eat.  Since her actual ceremony was earlier in the day, she wanted to provide coffee and donuts, snacks to munch on throughout the day, and a catered meal.  Just like it sounds, it was A LOT of food.  The guest definitely did not go hungry, and there was still a lot left over at the end of the day.  In this picture you are looking at 192 cans of pop, beer, wine, lots of fruits and vegetables, cheese and snack meats. 


They were not sure how much water we would need.  With all of those other drinks, we had 5 or 6 water jugs left over. 


On the counter is chips, crackers and cookies. 


There were many boxes of decorations to bring to the venue. We had multiple cars, and it took a couple of trips. 


To save on cost, but still match her nature theme, the bride had been finding items at thrift stores, and on marketplace.  She used these on the dessert and snack tables.  


She rented tablecloths in her wedding colors.  Half of the tables had vine runners, and the others had green mesh runners.  Every chair had a green sash tied around it. 


Both tables were lined with small glass jars with tea lights (see below) 


I helped the bride make these.  We wrapped the top with twine around the top of the jar.  Inside the jar is a little bit of greenery, small pearls and a white tea light.  


The main centerpiece was gorgeous.  She used large gold wrapped cans as a vase for the bouquet of flowers that she made herself. The base was a slice of a tree.  


Each table had a table number which really helped when it was time to go to the buffet. We were at the bride's family table so we went right after the main bridal party.  


On the dessert table, the large wooden tiered trays old delicious cupcakes of different flavors from a local bakery. 


On this tray are chocolate cherry and strawberry cupcakes. 


The newlyweds cut a small carrot cake. The bride has to eat gluten free, so this cake was safe for her to eat. 


The bride made all of the corsages and boutonnieres. She hand painted each of the handmade flowers before making the arrangements. 


The morning of the ceremony the guests were treated with coffee and donuts while they waited. The wedding was outside under a beautiful tree.  It truly was a magical day, and the decorations helped make it feel that way. 


Friday, September 15, 2023

Time to Dare to Share!


It's Friday night, and you know what that means.. 
It's time to Dare to Share! 

Tonight my blog post is going to be short and sweet.  We have had a very long week, but for a very good reason.  My bonus daughter is getting married tomorrow!  We were at the reception hall 13 hours today/tonight, and there is still more that needs to be done.  We have an early call tomorrow, because as part of the wedding party we have some special tasks that need to be done before the early in the day wedding.  The reception hall looks beautiful, and the weather is supposed to be perfect tomorrow. We are really looking forward to this day.

So since I am exhausted and need to get some sleep before our huge day tomorrow, let's get this party started! 

Link up and HAVE FUN! 


You are invited to the Inlinkz link party!

Click here to enter

Friday, September 8, 2023

Dare to Share Saturday!


 It is Friday night, and you know what that means.. 
It is time to Dare to Share! 

Are you ready for some football? I know I am very excited about this weekend, football is back at both the college and pro level. Ohio State has their first home game, and my Bengals have their first game of the season. :) Who Dey! 

We are also now in the final week of wedding prep for D's daughter's wedding.  I just finished some printables to use at the reception.  Last weekend I found a dress that I am pretty sure is a keeper, and we also bought almost 200 cans of pop with some great Labor Day deals. There are still things to do, but it is a good feeling to have a lot of it completed 


I know I mentioned a few weeks ago that I am now helping my friend with her bakery. We have a few events and a birthday cake coming up in the next few weeks.  What I love about this time of year is that we are starting to make Halloween treats to sell. I will be sharing more about our events and treats in the next few weeks.   This week I shared a post how to make devil fruit cake.  We were recently asked to make these for a birthday party, it wasn't too hard once we learned what they actually were. 


During last week's party, I posted that my Halloween Treasure Hunt was going to be live over the weekend. If you did not see my update I posted on the last week's party, it went live on Saturday.  You can see it in my Etsy Shop here.

Now that you know what I have been up to this week. I would love to see what you have been up to.  Link up and HAVE FUN!  


You are invited to the Inlinkz link party!

Click here to enter

Thursday, September 7, 2023

How to make a Devil Fruit Cake


Recently I started helping a friend with her bakery.  I have always loved to bake and making sweet treats, so when she asked me, I was quick to say yes.  She told me that we had an interesting cake request from a customer, but she was not sure exactly what they were asking for.  I have to admit I did not know what a devil fruit cake was at first either but I love to learn new things. I soon found out that they were from the anime series called One Piece.  One Piece is the longest running anime that started back in the late 90s and is still going.  Devil Fruits are very important to the characters of One Piece, because they give the character who eats it special powers. 


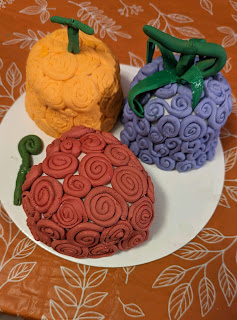
We were asked to make three small different devil fruit cakes.  One of the most popular devil fruits is the Gum Gum fruit which belongs to one of the main characters.  We also really liked the heart shape devil fruit called the Ope Ope fruit. 


Each of the cakes have swirls on the outside.  We decided to used fondant to make the swirls and attached it to the outside of the cake. 


This cake is the Chop Chop fruit.  


 We colored and rolled all the swirls for all three cakes and also made the stems out of fondant, hoping they would stay intact.  


They turned out pretty good, the customer was happy. and that's what counts.  There are a few minor things we would do a little differently next time, like color the fondant underneath so there is no white showing through.  We are now working on fall and Halloween items for a neighborhood market and a local festival. Stay tuned to see what we make.